Using and Troubleshooting Autofocus
This section provides an introduction to autofocusing in SerialEM then describes strategies for dealing with various kinds of autofocus problems.
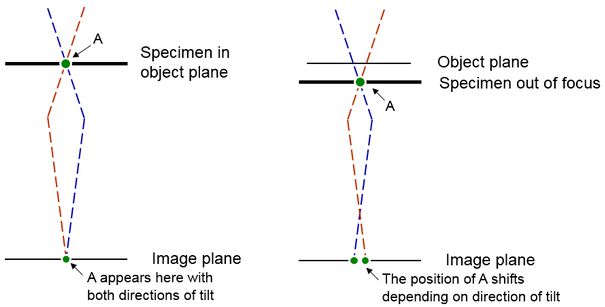
Autofocusing is done in SerialEM with the classic method of tilting the beam and measuring how much the image shifts. That operation is illustrated in this diagram. On the left, the specimen is in the object plane, and a particular point on the specimen always projects to the same point in the image plane regardless of the beam tilt, provided that the pivot points in the optical system are properly aligned to achieve this. On the right, with the specimen out of the object plane, differently tilted beams passing through the same point on the specimen project to different places in the image plane, and thus the image appears to shift when the beam is tilted. In the diagram, the image will shift by a distance proportional to the distance between the points where the two tilted beams cross the object plane. The amount of shift will thus be approximately proportional to the distance from focus, and also to the amount of beam tilt.

After the autofocus routine measures the current defocus, it changes the defocus by the amount needed to reach the target defocus that you have selected; typically a few tenths of microns of underfocus for stained samples and several microns for cryosamples (with negative numbers for underfocus). However, if the change is very large, the program will limit the change to a set amount (16 microns by default) and repeat the operation. It may take several iterations to change focus, and the program may even abort the operation if inconsistent results are obtained during these iterations.
Three variations on the autofocus operation, available in the Focus menu, are useful when setting up autofocus or diagnosing problems with it. None of them require an autofocus calibration to exist yet.
There are several reasons why autofocus can be inaccurate or fail to work, addressed in the following sections.
Specimen drift
Since we are measuring shifts between successive images, one source of inaccuracy is specimen drift. This inaccuracy can be reduced by taking three images, with a positive, negative, and positive beam tilt. The drift can be estimated by the shift between the first and last image and subtracted off to determine just the shift induced by the beam tilt. The option to take three images is set with the Drift Protection entry in the Focus menu and should be left on unless there is a good reason to turn it off. If the drift is constant over time, then this procedure will eliminate its effect. More likely, it declines between the first and second pair of pictures, such as when the stage settles from tilting, so there may still be some residual effect from drift. To reduce that effect, try to minimize the interval between images. With older styles of CCD camera, this is accomplished by taking a subarea with binning, as well as by having a fairly short exposure time. With a direct detector, it is more difficult to get fast images because the full chip is read out regardless, and binning and subarea extraction occur in software. With some newer CCD cameras, particularly fast-readout ones, using a subarea and binning make relatively little difference, but the images are fairly fast anyway. Nevertheless, there are other advantages in using smaller images that still apply with all cameras.
Fixed pattern noise
If the images contain sufficient fixed pattern noise from the camera, this noise can produce a strong peak in the cross-correlation at zero shift, obscuring the correct peak. This problem will show up particularly at low tilt, and it may even cause problems in calibrating autofocus. (At higher tilts, one image is stretched to compensate for stretching induced by the beam tilt, spreading out the noise peak and reducing the problem.) It is easy to recognize that fixed noise is a problem when more than one shift near 0,0 shows up during autofocus calibration, or when autofocus reports a defocus very near zero even though images are clearly shifted; however, sometimes the correlation fails only for one of the two pairs of images, giving an intermediate defocus value. The best way to diagnose this problem is to obtain images from an autofocus that fails and use the Show Existing Corr command. The solutions to pursue in order, are:
Low beam-induced shift at high tilt
Some specimens show low or virtually no shift between the beam-tilted images at the highest tilts, usually only above about 50 degrees. The sign of this problem is a measured defocus near zero even when the defocus is several microns or more, coupled with the absence of appropriate shifts between the autofocus images. If the target defocus is not also very near zero, then the program will repeatedly change the focus by the target value, resulting in a runaway focus. There is a procedure, Check Autofocus, that can be run to check for this kind of problem; it measures defocus 5 microns above and below the current defocus and reports how much of the actual focus change it can detect. This routine can be run automatically at the start of a tilt series, which is useful when running tilt series in one direction from high tilt. There are two different strategies for dealing with the problem.