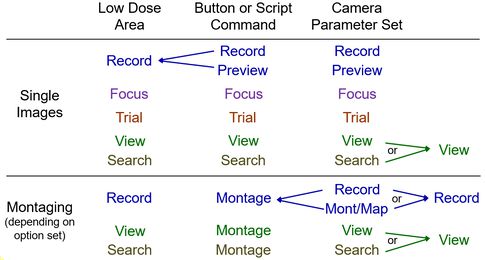
The essence of low dose mode is that focusing and tracking operations for a tilt series are done in a location separate from the area being recorded, to spare that area from unnecessary beam exposure. In order to provide accurate focusing and tracking, these separate areas must be displaced along the tilt axis from the center of the recording area. SerialEM's low dose mode provides five 'areas' that can be defined to have different settings of magnification, spot size, and beam intensity, centered in up to 3 different locations. They are named for the corresponding camera parameter sets that are used to acquire images from them. The areas are:
Although the Focus and Trial areas can be set up with completely independent parameters, it is most convenient to constrain them to be identical. This saves the effort of setting up the beam for both areas, avoids the image shift settling time required for getting between them, and minimizes the total range of image shift needed for low dose work. The latter factor is important on the 300 KV Tecnai or Polara because the objective aperture begins to occlude the image area for relatively small image shifts. Image shift is also quite limited on the JEOL 2100/2200 unless the scope has the high power image shift option, although projector shift is usually used for image shift to minimize this problem.
Microscope Parameters Stored. The parameters that can be set separately for each low dose area are the magnification, spot size, beam brightness, filter settings if there is an energy filter. The latter include whether the slit is in, and the slit width and energy loss. On a Thermo/FEI scope, the probe mode (nanoprobe versus microprobe) is also stored. On the JEOL, the alpha setting can also be set separately, although no more than two alpha settings can be used. Absolute beam position is not stored, but a relative beam shift between areas can be set. Diffraction mode can be used for any area, although it is likely to be useful only for the Search area. If diffraction is used, the camera length and diffraction focus are stored as parameters.
Special Features in Low Dose Mode. In low dose mode, numerous features of SerialEM operate differently.
Setting Properties of Areas. You can set the properties of a low dose area by making it be the current area then adjusting its features. The current area and its beam properties are displayed on the second line of the Low Dose control panel . There are two ways to set the current area: take an image of the area, or select the area with the 'Go to' button in the control panel. You can adjust most properties of the current area by turning on the 'Continuous update of mag & beam' checkbox. With this option on, any changes in the magnification, spot size, condenser lens setting, or energy filter settings will change the defined properties of the area. However, beam position is still a global feature that applies to all low dose areas, so a change in beam position is not recorded with 'Continuous update' on. (A relative beam position can be set for each area with a separate control.) If the option is off, you can change these features temporarily, but the stored properties of the area will be reimposed next time a picture is taken of the area. An exception to this is that a change in intensity with the Set Intensity or Set Dose Rate commands in the Tasks menu will change the stored properties of the area.
If you want to make initial adjustments to the properties of an area with no exposure of the specimen at all, then select the area with a 'Go to' button and adjust its features.
Setting Positions of Trial/Focus Areas. The positions of the Focus and Trial areas can be set by selecting the Focus or Trial radio buttons in the 'Define position of area' box. Once one of these buttons is selected, two pieces of information become available at the bottom of the Low Dose control panel . One is a text box showing the distance along the tilt axis from the Record area to the area being defined, where negative and positive numbers reflect opposite directions along the axis. The other display shows essentially a safety factor for spillover of the beam from the area being defined into the Record area. On a Titan microscope where illuminated area is available, or on other kinds of scopes where beam size has been calibrated, an estimated beam size is available for the current intensity setting of the area being defined, and the distance between a centered circle of the estimated size and the edge of the Record area can be computed and shown. This is referred to as a "true" area separation. Otherwise, the only value available is the distance between a circle circumscribing the area being defined and the edge of the Record area, referred to as a maximum area separation.
There are several ways to adjust the position of the area being defined. In addition to simply typing in a distance in the text box, the most convenient is to take a picture of the View area. The position of the area being defined relative to the center of the View will be shown by a green cross, and you can click with the left mouse button to select a new position. On a View image, the Record area and the area being defined will also be shown with a box. The beam is represented in this display with either a solid circle circumscribing the area being defined, or dashed circles based on "true" beam sizes if available, or both kinds of circles. The kind of display can be selected with the Set Type of Beam Circles in LD Define command in the Settings - Specialized and Misc Options submenu. See the Low Dose control panel help for details on this feature and on how to adjust the intensity value and see the size change. If the solid circle is being displayed and Focus and Trial are being kept at the same position, it will circumscribe the larger of their two acquisition areas. They can be kept together either with the Keep Focus and Trial identical option in the Low Dose control panel or with the specialized option in the Settings menu, Keep Focus & Trial at Same Position. In the latter case, the magnifications of the two areas are taken into account when picking which area to circumscribe.
Offsets. Several different "offsets" can be set by different procedures:
Balancing Shifts. The final concept that needs explaining is that of balancing the shifts. On the 300 KV Tecnai, one should think of the objective aperture as defining a circle within which the specimen can be imaged by means of image shift. If the Record area is in the middle of this circle, then the Focus and Trial areas will be displaced to near the edge of the circle, and there may not be much range of image shift left for tracking during the tilt series. Given these limitations, it is preferable to arrange the Record and Trial areas so that the center of the circle is midway between them, because then neither one will be as close to the edge of the usable circle as the Trial area is with the Record area in the center. This is accomplished by pressing the 'Balance Shifts' button. The change can be undone by pressing the 'Center Unshifted' button, so-called because it will recenter the areas that are considered unshifted (Record and View).
Your low dose parameters are saved to your settings file and will be restored when you restart SerialEM. If you have never started low dose before, the areas are undefined, and they will acquire the current microscope settings when they are first activated. Three sets of parameters are stored: one for a non-energy filter camera, one for an energy filter camera, and one for STEM.
Steps for Initially Setting up Low Dose
It is somewhat difficult to get low dose set up initially, but following a set procedure may be helpful.
If you are restarting with some existing parameters, you would not do all of these steps. You would probably take a View and adjust its properties if necessary (steps 2 and 3), take a Record and adjust its properties (steps 5-9), then adjust the Trial/Focus area (steps 11-14).
Montaging in Low Dose Mode
In low dose mode, montaging (acquisition of overlapping images) is most commonly used to obtain low or medium magnification maps in the Navigator for finding and marking areas to be acquired; however, it is also possible to acquire higher-magnification montages with the Record area. If low dose mode is on when the Montage Setup dialog box is opened, the montage is dedicated to being taken in low dose mode and the dialog enables a set of radio buttons for choosing which low dose area to use, and which camera parameters to use when montaging with the Record area. In the latter case, either Mont-Map or Preview parameters can be used instead of having to modify the Record parameters. In addition, montages can be taken with the Multiple Record routine, which can compensate for the effects of image shift on beam tilt; however, these montages have several other special features listed in the help for the Montage Setup dialog box.